How to control robot with your phone using BLE?

A robot is a machine which responds to commands. These commands are programmed by the user to achieve a specific task. Robots are made by actuators, motors and sensors and a control system which contains a microcontroller. The robot we are going to make is a simple rover made by two DC motors which can go forward, backward, turn right or left by giving commands from a smartphone. The wireless technology we are using here is Bluetooth low energy (BLE) which comes integrated with the “seeed studio BLE sense†board. BLE consumes less power as compared to standard Bluetooth module HC-05. So lets get started with the project.
Components required
- NRF52840 sense
- L293D motor driver
- Robot car chassis (with two DC motors)
- USB C type cable
- Jumper wires
- Battery holder of 4 cells
- AA batteries – 4pcs
Once we got all the necessary components along with proper robot chassis kit. Now we are ready to make the hardware connections. Connect the components according to below given circuit diagram.
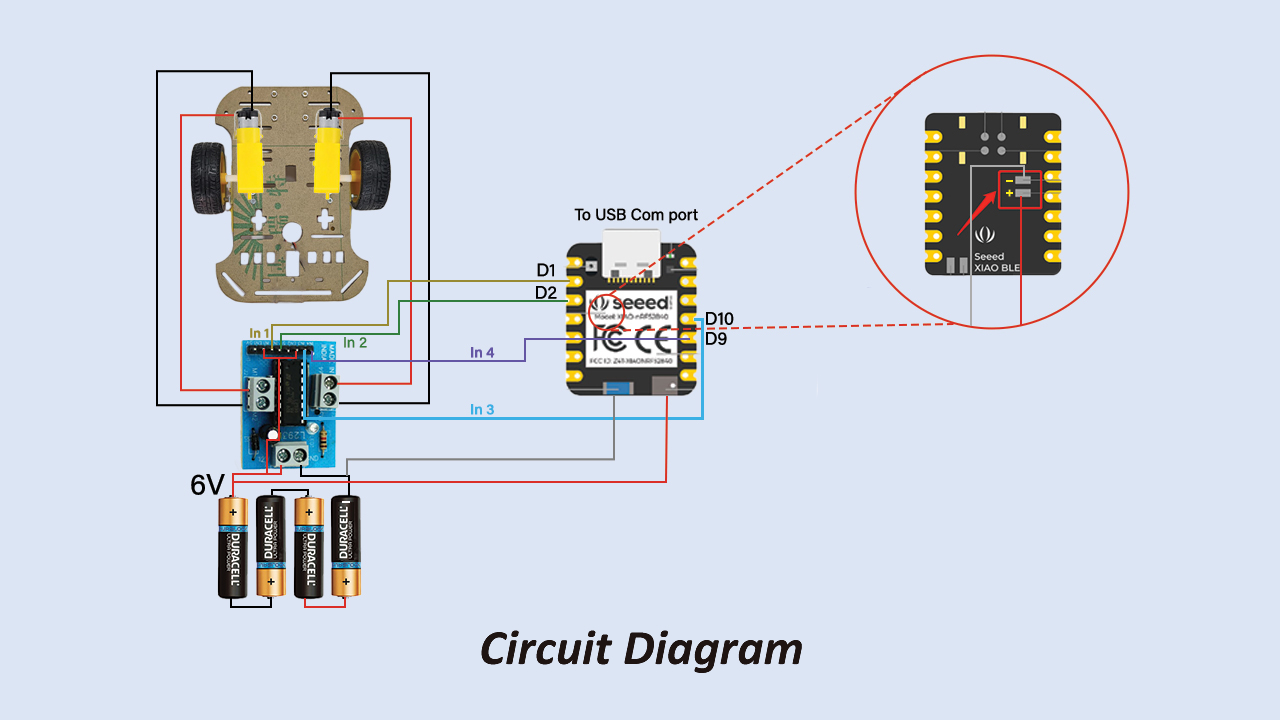
Working of L293D motor driver
The L293D motor driver is the best option when it comes to controlling DC motors. It has integrated dual H-bridge. Using just one single driver we can control 2 motors. It has 4 outputs M1, M2, M3 and M4. One motor is connected to M1 and M2 and another is connected to M3 and M4. It also has 4 inputs to control the direction of motor IN1, IN2, IN3 and IN4. Giving HIGH to IN1 and LOW to IN2 causes the right wheel to move forward. In similar way if we reverse the order and give LOW to IN1 and HIGH to IN2 causes the right wheel to move backward. Same goes for controlling the left wheel just the inputs are IN3 and IN4.
Making the seeed studio boards compatible with Arduino IDE.
Before uploading the code we need to add the seeed studio boards compatible with Arduino IDE.
Step 1 - Copy the below given link.
https://files.seeedstudio.com/arduino/package_seeeduino_boards_index.json
Step 2 – Open Arduino IDE >> file >> preferences

Step 3- Paste the link in “Additional Boards Manager URL’sâ€. If there are other links then you can separate the links with comma. Then click on “okâ€. The boards are now added to the board manager.
Step 4- Open “board manager†and search for keyword “seeed nrf52â€. You will find two board libraries. Install both of them.

Now that all seeed studio boards are added to the Arduino IDE, we can select our board and upload program to it.
Adding the ArduinoBLE library
Step 1 – The library zip folder will be downloaded
Step2 – Go to sketch >> include library >> add .zip library. Then browse to the location where the zip folder is downloaded. Open the zip folder and the library will be installed.

The “ArduinoBLE.h†library is now installed. Now we can upload the code to the “seeed studio sense boardâ€.
Selecting the board and port before uploading.
Go to tools >> boards >> “Seeed nrf mbed enabled boards†>> select the “seeed xiao BLE sense†board.

Go to tools >> port >> select the proper com port >> copy the below given code and paste it >> hit upload button.
Code
#include <ArduinoBLE.h>
BLEService ledService("19B10000-E8F2-537E-4F6C-D104768A1214"); // Bluetooth® Low Energy LED Service
// Bluetooth® Low Energy LED Switch Characteristic - custom 128-bit UUID, read and writable by central
BLEByteCharacteristic switchCharacteristic("19B10001-E8F2-537E-4F6C-D104768A1214", BLERead | BLEWrite);
int in1 = 1;
int in2 = 2;
int in3 = 10;
int in4 = 9;
void setup() {
Serial.begin(9600);
while (!Serial);
// set LED pin to output mode
pinMode(LEDR,OUTPUT);
pinMode(LEDG,OUTPUT);
pinMode(LEDB,OUTPUT);
digitalWrite(LEDR,HIGH); //turn off all the led's
digitalWrite(LEDG,HIGH);
digitalWrite(LEDB,HIGH);
// begin initialization
if (!BLE.begin()) {
Serial.println("starting Bluetooth® Low Energy module failed!");
while (1);
}
// set advertised local name and service UUID:
BLE.setLocalName("Robomartbot"); // You can change this. Give any name to your bluetooth device.
BLE.setAdvertisedService(ledService);
// add the characteristic to the service
ledService.addCharacteristic(switchCharacteristic);
// add service
BLE.addService(ledService);
// set the initial value for the characeristic:
switchCharacteristic.writeValue(0);
// start advertising
BLE.advertise();
Serial.println("BLE controlled robot");
}
void loop() {
// listen for Bluetooth® Low Energy peripherals to connect:
BLEDevice central = BLE.central();
// if a central is connected to peripheral:
if (central) {
Serial.print("Connected to central: ");
// print the central's MAC address:
Serial.println(central.address());
// while the central is still connected to peripheral:
while (central.connected()) {
Serial.println(switchCharacteristic.value());
if (switchCharacteristic.written()) {
if (switchCharacteristic.value()==102) //forward 'f'
{
Serial.println("Forward");
digitalWrite(LEDG, LOW); // changed from HIGH to LOW
digitalWrite(LEDR, HIGH);
digitalWrite(LEDB, HIGH);
digitalWrite(in1,HIGH); //left wheel forward
digitalWrite(in2,LOW);
digitalWrite(in3,HIGH); //right wheel forward
digitalWrite(in4,LOW);
delay(1500);
digitalWrite(in1,LOW); //stop
digitalWrite(in2,LOW);
digitalWrite(in3,LOW);
digitalWrite(in4,LOW);
}
if (switchCharacteristic.value()==98) //backward
{
Serial.println(F("Backward"));
digitalWrite(LEDR, LOW); // changed from LOW to HIGH
digitalWrite(LEDG, HIGH);
digitalWrite(LEDB, HIGH);
digitalWrite(in1,LOW); //left wheel backward
digitalWrite(in2,HIGH);
digitalWrite(in3,LOW); //right wheel backward
digitalWrite(in4,HIGH);
delay(1500);
digitalWrite(in1,LOW); //stop
digitalWrite(in2,LOW);
digitalWrite(in3,LOW);
digitalWrite(in4,LOW);
}
if (switchCharacteristic.value()==108) //left
{
Serial.println(F("left"));
digitalWrite(LEDB, LOW); // changed from LOW to HIGH
digitalWrite(LEDR, HIGH);
digitalWrite(LEDG,HIGH);
digitalWrite(in1,LOW); //left wheel backward
digitalWrite(in2,HIGH);
digitalWrite(in3,HIGH); //right wheel forward
digitalWrite(in4,LOW);
delay(250);
digitalWrite(in1,LOW); //stop
digitalWrite(in2,LOW);
digitalWrite(in3,LOW);
digitalWrite(in4,LOW);
}
if (switchCharacteristic.value()==114) //right
{
Serial.println(F("right"));
digitalWrite(LEDR, LOW); // changed from LOW to HIGH
digitalWrite(LEDG, LOW);
digitalWrite(LEDB, HIGH);
digitalWrite(in1,HIGH); //left wheel forward
digitalWrite(in2,LOW);
digitalWrite(in3,LOW); //right wheel backward
digitalWrite(in4,HIGH);
delay(250);
digitalWrite(in1,LOW); //stop
digitalWrite(in2,LOW);
digitalWrite(in3,LOW);
digitalWrite(in4,LOW);
}
if (switchCharacteristic.value()==115) //stop
{
Serial.println(F("stop"));
digitalWrite(LEDR,HIGH); // changed from LOW to HIGH
digitalWrite(LEDG,HIGH);
digitalWrite(LEDB,HIGH);
digitalWrite(in1,LOW); //stop
digitalWrite(in2,LOW);
digitalWrite(in3,LOW);
digitalWrite(in4,LOW);
}
}
}
// when the central disconnects, print it out:
Serial.print(F("Disconnected from central: "));
Serial.println(central.address());
}
}
Sending commands from mobile app to Xiao BLE sense board.
After the code is uploaded, open the serial monitor. If it shows the message “BLE controlled robot†then only the board will be detected by the mobile app. So make sure that the message “BLE controlled robot†is printed or else it may not work.
Step 1 - Download the “nRF connect†app. It’s free on playstore.
Step 2 – Turn on the Bluetooth of your mobile and open the app.
Step 3 – The scanning will start and your device name will appear. In my case it’s “Robomartbotâ€. Connect to your device. After connecting the default value “0†will start printing on the serial monitor.
Step 4 – select “Unknown Service†>> Select the up arrow to write data. >> In the write value select text >> send a character ‘ f ’ for forward >> Refresh the serial monitor. You will see 102 getting printed on the serial monitor. In similar way we get the code for ‘b’ - backward, ‘l’ – left and ‘r’ – right.
1 Comment(s)
This is an awesome and helpful article for me. I appreciate your work providing such useful information; thank you so much!
Leave a Comment